PicasaPicasaPicasaPicasaPicasaPicasa

Tuesday, 30 April 2013

This month I'm loving... Water Decal Paper

If you've never heard of Water Decals, your missing out! They are basically are super easy way of adding art to your nails and work in a similar way to temporary tattoos.

The only thing is, they can only be used once. Thats why I think it is a bit of a waste of money buying one sheet, which costs on average £2+. So the alternative is to make your own! Hence the reason the word paper was mentioned in the title.
I prefer to make my own as you can have as much freedom and creativity as you like and its a lot cheaper too! Here are some simple instructions that I've put together explaining how to make you own:

Its a fairly easy process and all you need is:
-A sheet (or pack) of tansparent printable water decal paper
-A computer and printer
-A pair of scissors
-Clear topcoat
-A bowl/cup of water

All you have to do is first make or find the images you want to make into the decals online and put them altogether on a page on something like Microsoft PowerPoint or Publisher and then print it out! You can print to whatever size your printer will allow and you can print virtually anything!
an example of what I printed
Once its printed, let it dry for a bit and then cut out the part you want to use. If you are doing a full nail pattern, I would suggest cutting it to a shape the same as your nail as it will just make it a bit easier. Then paint over the whole piece with a clear topcoat, but DO NOT use Seche Vite as it will make it peel.

When the topcoat has dried fully, fill a cup or bowl with water and, holding the very tip of the image, submerge it into the water. Some brands may differ but the one I use says to keep it underwater for 30-60 seconds. Regardless of the time, you will know when it is done because it will start to peel away from the backing paper.

Once it starts to peel off, place a small corner onto your nail in position and press down. While you do that, slowly slide the backing paper away and press the decal firmly onto your nail. I recommend using a tissue over your finger when you press the decal down because it will absorb any water remaining and help the decal stay.

The final step is to topcoat it to seal it all in!

See, easy! Here is a quick look I created:

Friday, 26 April 2013

Ask A British Nail Blogger... "How do you store your polish?"


HOW DO YOU STORE YOUR POLISH?

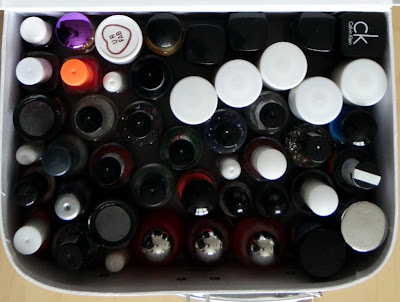
This is a question I always get asked by people! I guess by having so much of something does eventually pose a storage issue which needs to be addressed and so this is my solution:

Okay so currently I have 11 suitcases that I store all my polish in. I know most bloggers and polish-addicts use Helmers, but I don't really see the appeal personally... And plus I like the fact that I can add or remove suitcases depending on my needs instead of having empty or overflowing drawers.

Anyway, onto the stash.... (This doesn't include the storage of all my nail art bits and bobs)
Suitcase 1:

Suitcase 2:

Suitcase 3:

Suitcase 4:

Suitcase 5:

Suitcase 6:

Suitcase 7:

Suitcase 8:

Suitcase 9:

Suitcase 10:

Suitcase 11:

If you would like to see individual bottle shots of particular brands or anything just let me know!


Tuesday, 23 April 2013

31 Days of Nail Art Challenge - Day 25 - Inspired by Fashion

Fashion.

For those of you that know me, you will know I'm very into fashion.

So much so that within my group of friends I am the girly/creative/fashion-y 'one'.

For this theme I decided to go simple and so this is inspired by my favourite vintage dress.
I used Avon Suede in blue Royale as a base and then a dotting tool and white polish to add the dots.

I love these! I think dotticures can look so simple yet stylish!


Sunday, 21 April 2013

Covent Gardens and Wicked

Yesterday I went to Covent Gardens with some friends for one of my best friends birthday. The reason we went was so we could surprise her with tickets to see WICKED!

We met up and first went to Covent Garden. I'm pretty sure it's one of my favourite places in London because its really interesting and the markets actually sell rather nice things. That and the fact that in the summer (and other times of the year when the weather holds up) you get some really awesome street performers doing their thing!

I also got me a Krispy Kreme ;) (I swear all I ate yesterday was junk food!)
Here are some photos of Covent Gardens.

If your wondering, these are all pens!
Are these not the cutest?!?
There was one rude stall lady who told me off for taking photos... She could have at least said it nicely :/

So as a surprise birthday present we put money in to buy a ticket for Aisha to go and see Wicked for the first time, and a few of us went to see it too.
All of us :)
 Thanks to Amy we got FRONT ROW tickets at an amazing price! It was also my first time going and Oh My it was AMAZING!! Everything from the costumes to the songs and the set and scenery to the acting and dancing, it was all just so WOW.
 
For those of you that don't know what Wicked is about, its basically the 'behind the scenes' story of The Wizard of Oz and how all is not as it seems. I won't spoil the story but what I'm trying to say is that I highly highly recommend you go and see it if you have the chance. You won't be disappointed!

Friday, 19 April 2013

Soap & Glory Face Soap and Clarity


A different kind of post today!

This is a review of the Soap & Glory Face Soap and Clarity face wash.

I originally got this free as part of an offer in Boots but you can buy it for £7.00 here or for £6.50 in Harvey Nichols here.
I don’t normally comment on packaging but I really did like the look of this one. It was bright and bold and just livened up my bathroom shelf a little bit more!

Everything you need to know about the product is clearly presented on the front.
You do get a good amount of product for the price and because you don’t need much each use, it can last even longer.

At the back there is some easy instructions on how to use the product. All you have to do is squeeze out a little bit of it onto your hands and rub it into damp skin until it starts to foam and then simply wash it off.
The face wash itself is a clear light blue, sort of runny gel like formula with small pink exfoliating micro-beads suspended within it. To be totally honest with you, I don’t think the beads did much for me. There were too few for them to be exfoliating and because of the gel like formula, I couldn’t even really feel them. I lightly foams up but still has a gel like feel, if that makes sense. It had a nice fresh scent and a little really does go a long way.
After using this face wash my skin definitely felt cooler and brighter and somewhat smoother. BUT, I did notice it was also drier, which is the total opposite of what it claims to do. Generally though it did do what it claimed to and didn't leave a tight or burning feeling to the skin.

So now that I have used all of the product up, I can safely say it will last you over a month of washing your face twice a day.
And so does it live up to what it claims to do? Well mostly yes! Here’s a quick reminder or the claim:
"A high-tech, gentle non-drying foaming facial wash, formulated with complexion-friendly, easy-rinse surfactants and special SUPERFRUIT™ PLUM skin brightening complex" 
Bottom Line: As much as I liked this product, I did find it dried my skin a bit too much (but that may have been partially down to the freezing winter we've had).

Would I repurchase? Hmm, maybe not right now but I might consider it in the summer.

Monday, 15 April 2013

31 Days of Nail Art Challenge - Day 24 - Inspired by a Book

Books.

I love to read but because of all these exams I just don't have the time! :(

So for this theme I decided to base it on something from my childhood again. And so I came up with.... The Mr Men and Little Miss books!

I know they aren't great but it was fun drawing instead of stamping for a change!
From top to bottom: Mr Messy, Mr Daydream, Mr Strong, Mr Happy

When I was little I had about 12 Mr Men and Little Miss books... I just found out that there are 80+ Mr Men and Little Miss books available now!

Saturday, 13 April 2013

31 Days of Nail Art Challenge - Day 23 - Inspired by a Movie

Movies.

I love watching films but I can never find the time to watch them anymore :(

So for this theme I decided to base it on a film character from my childhood.

And that is... Minnie Mouse!

Instead of actually drawing her, I used bits of her 'look' (basically her dress and hairbow) to recreate.
For the base I started with Revlon Mon Cherry, which is one of their scented polishes. It smells pretty nice, but not of cherry unfortunately. Then I added the white dots using Models Own Snow White and a dotting tool. For the bow I added a coat of China Glaze Ruby Pumps before adding the dots, and then drew on the bow.

I love how it is such and iconic look that even people on the bus commented saying it looked like Minnie Mouse nails!

Thursday, 11 April 2013

Sinful Colours Nail Junkie

So Sinful Colours has recently landed in the UK in most larger Boots stores and if you read this post, you'll know that I grabbed myself a few!

One of those was Nail Junkie, which was the first one I was drawn to and doesn't it just describe me perfectly! Haha ;)
I looooove this polish!
Its a gorgeous teal coloured jelly base packed with iridescent, teal and blue micro and hex glitter .
The first coat was quite sheer and patchy and I thought it would take something like 5 coats to make it opaque but after applying a thick-ish second coat it was actually fine and I just added a final thin third coat to add depth.
Due to the jelly base it will never be totally opaque but I like the finish, it makes it look lovely and squishy.
It dries to a ever so slightly textured finish, partly because of the amount of glitter and it looks good left like that but I added a thick layer of topcoat.
no topcoat
with topcoat
Does anyone else think this looks like an awesome indie?
Related Posts Plugin for WordPress, Blogger...